Process Blog

Gifstravaganza!
As showing works better than telling, here are time-lapse gifs of many of the pieces included in the AlterPieces project.  Each frame of the gif represents one or more layers of enameling and firing the piece.  Details on the characters and their origins can be found in a PFD in the "Writings" section.

Aurelia, Dragonborn Warrior

Fyre, a Russet Genet

Variska Twice-Born, evil and pragmatic

Juno's Daughter, a computer program

Oz, jaded vampire

Ixonia, half-elf of dubious character but much charm

Tarik, Saljuk Turk, scribe, and gentleman

The Wardane, deity of shadow and magic

Eve, sentient AI

Commander Dilliad, Lamenters Space Marine Librarian

The eyes have it

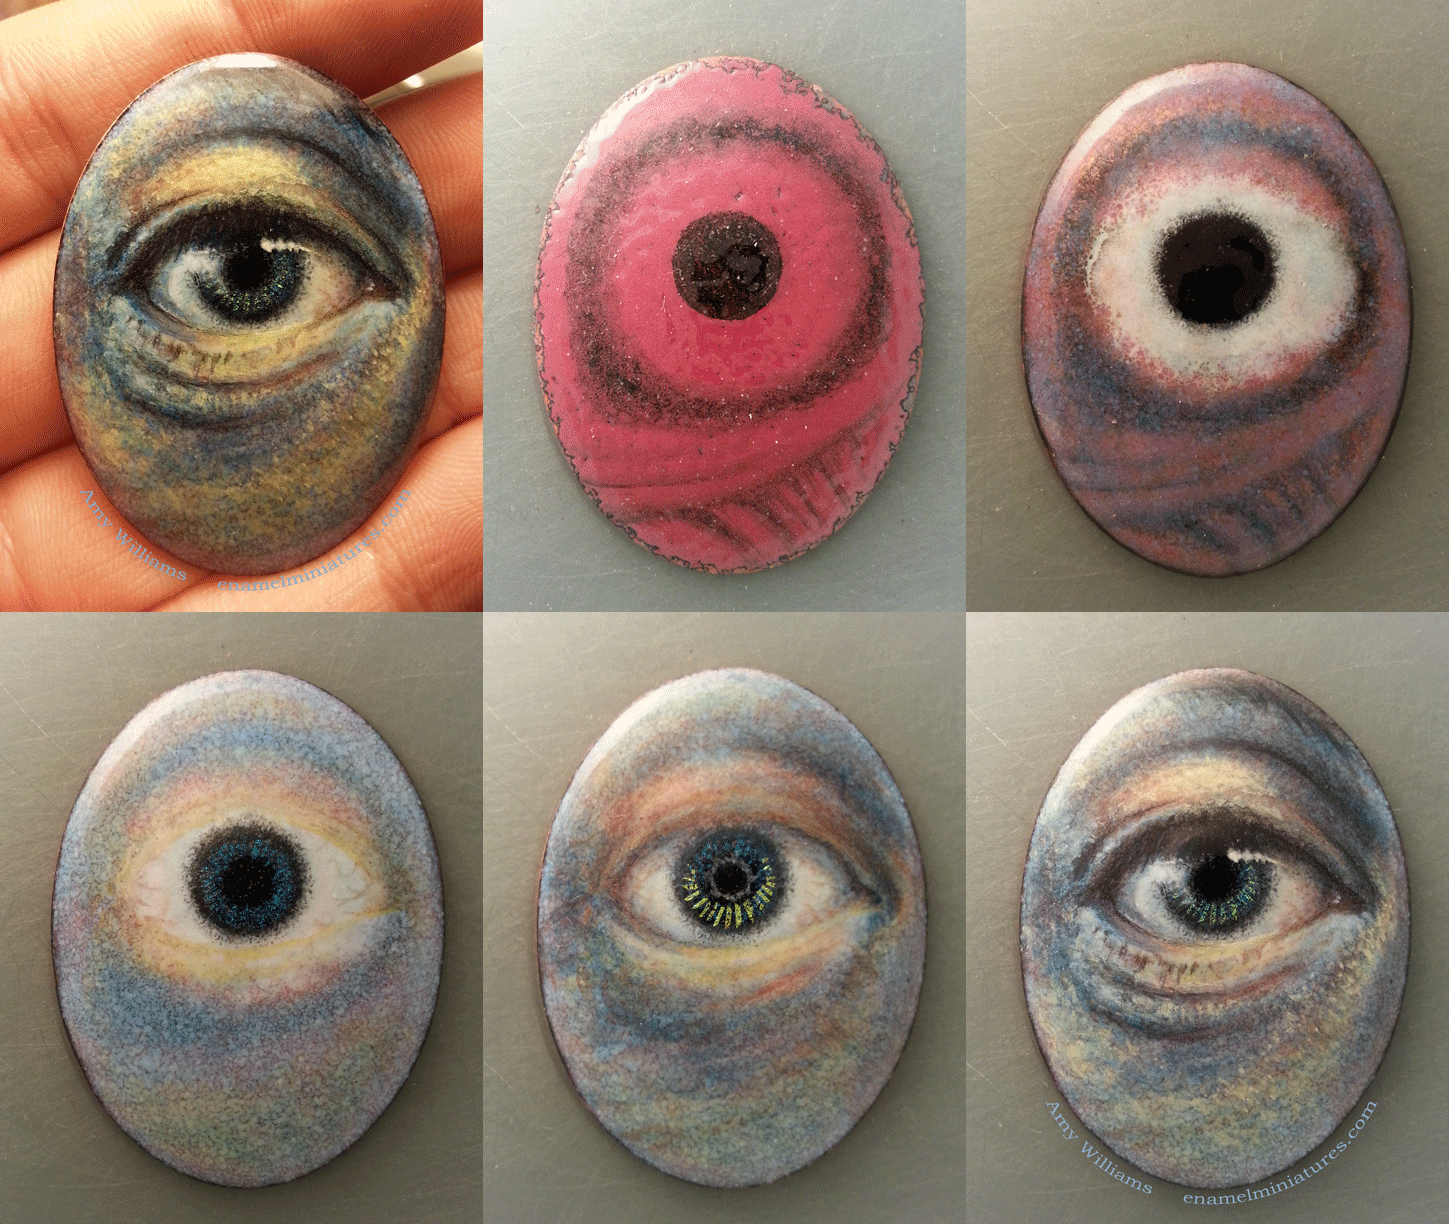
Beginning to move farther into the actual pieces, I've created an eye for the vampire Alexander, of the Harbingers of Skulls.  Ole' Alex is basically a walking corpse with an acute interest in the mortality he has been denied, and spends a great deal of time cutting people open to see how they tick (and to see the ticking stop). 

Alexander-EyeLG.gif

I focused on the underlying structure of the body with this piece and worked a lot with translucent layering, saving the opaques for surface highlighting and the pupil.  I also tried out my dichroic decals for the first time with the pupil's coloration.  I made a couple attempts at clouding the eye over with a milky cataract, but felt it undercut the effect of being looked at by too much for the piece to remain effective.

Moving on, we have Eve, an artificial intelligence effectively undergoing adolescence.  The player described her as curious and in many ways rather carefree (with the belief in her immortality native to teenagers everywhere, I think), but one of the things which really stuck with me in the description is how the character was removed from play: her primary contact with the world was severed, leaving her as an isolated computer.  For that reason, I went with a largely silhouetted profile with can be seen as emerging towards a surface or falling away from it, and her expression is rather stricken. 

EveProfile.gif

The piece is comparatively minimalistic, and while I like it, I may shift the rest of the work to more strongly favor the eyes.  During a critique, it was noted that the portraits allow you to look at the character, but when they are cut down to the eyes alone, the character is looking at you.  I think that serves me better, particularly considering the way many of these alter-egos are kept out of public view.  Even if you don't want to tell your classmates or co-workers about your knight/vampire/fursona, what happens when the character is able to look right at them and you don't have to explain yourself? 

Cast Settings

Hey, remember these guys?  These are my finished master patterns for my enamel settings.  I designed the steel sheet cutouts and sculpted rims onto them using epoxy putty, with the aim of creating molds from them and casting pewter onto the cutouts.  Here's how that went.

Left: Pendant.  Right: Brooch.

Left: Bolo tie.  Right: Ribbon-strung pendant.

Game piece.

War medal with ribbon hanger.

I ended up having to nix the game piece in pewter for the moment due to the size of the base; it ends up absurdly heavy and too wide for most game boards.  At some point I'll have to figure out how to accurately gauge the weight shift between the sculpting material and the metal casting.  For the time being, I'll be making the game piece from resin.  Casting it in an epoxy resin requires the wide base due to how lightweight it is, but I will narrow the base and hollow it out slightly for a pewter cast, similar to the footprint of a chess piece.  However, I will make alterations to a resin cast rather than to the direct sculpture because physical pieces don't have an undo function. 

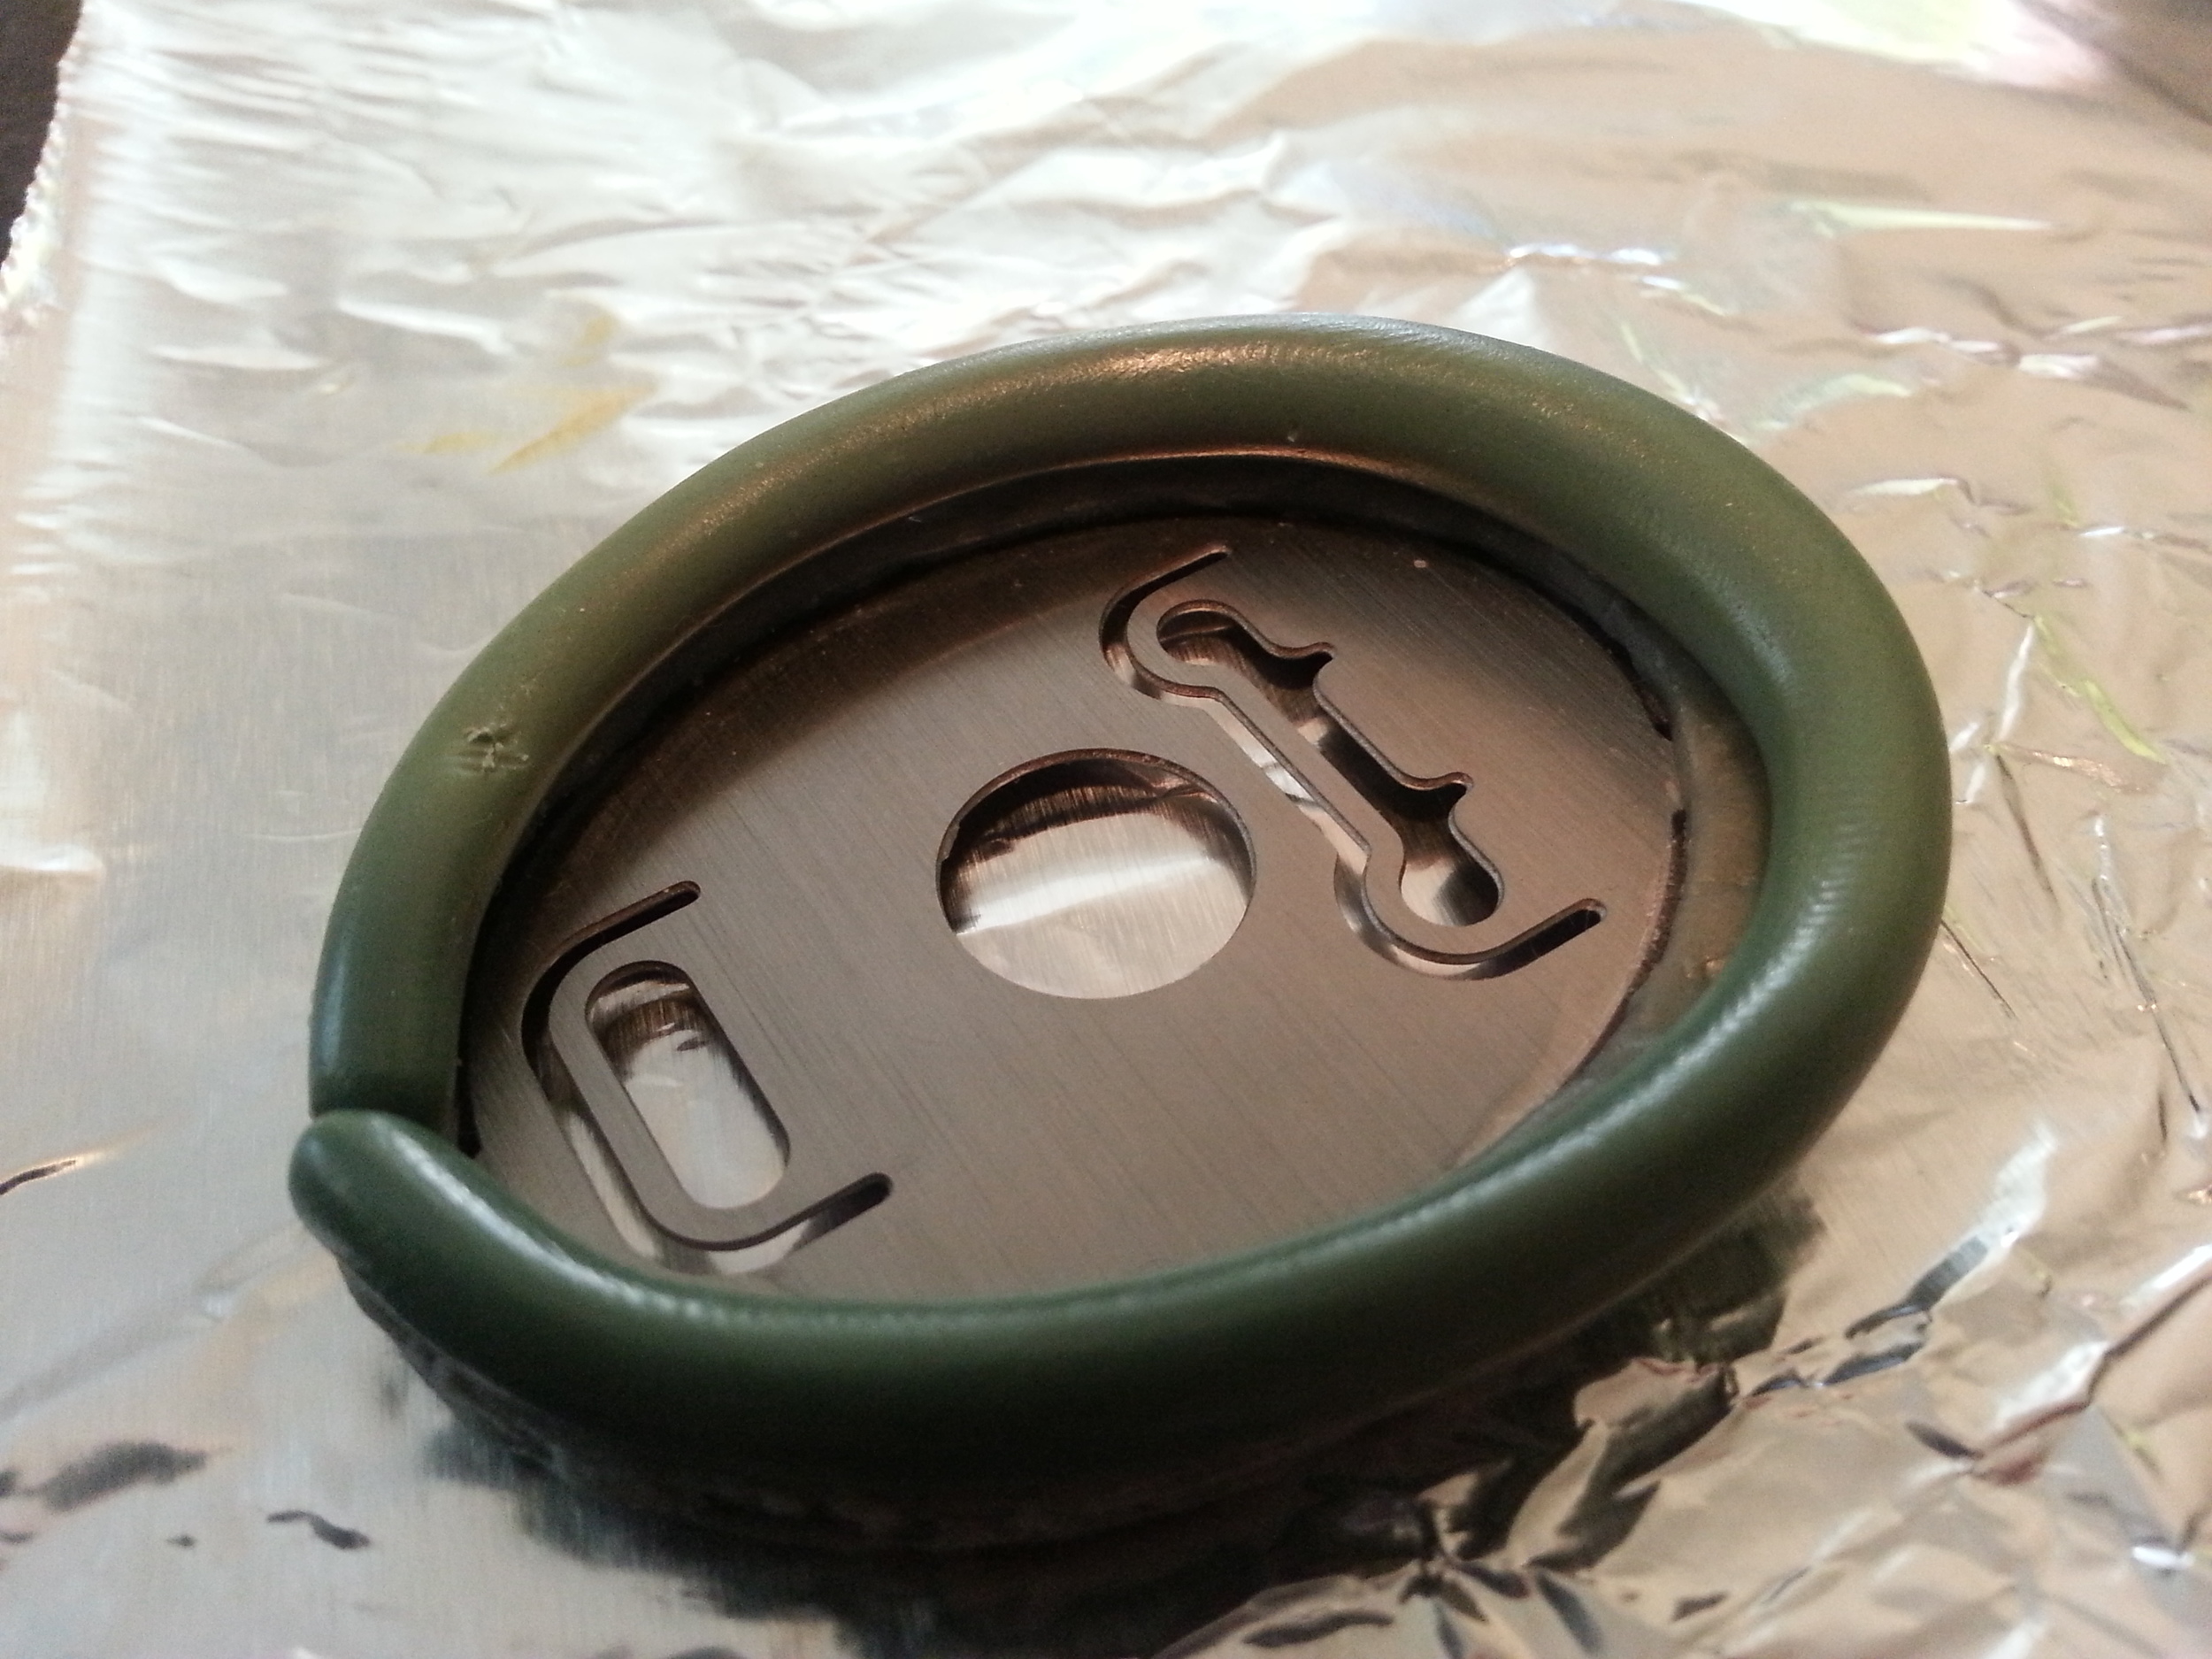
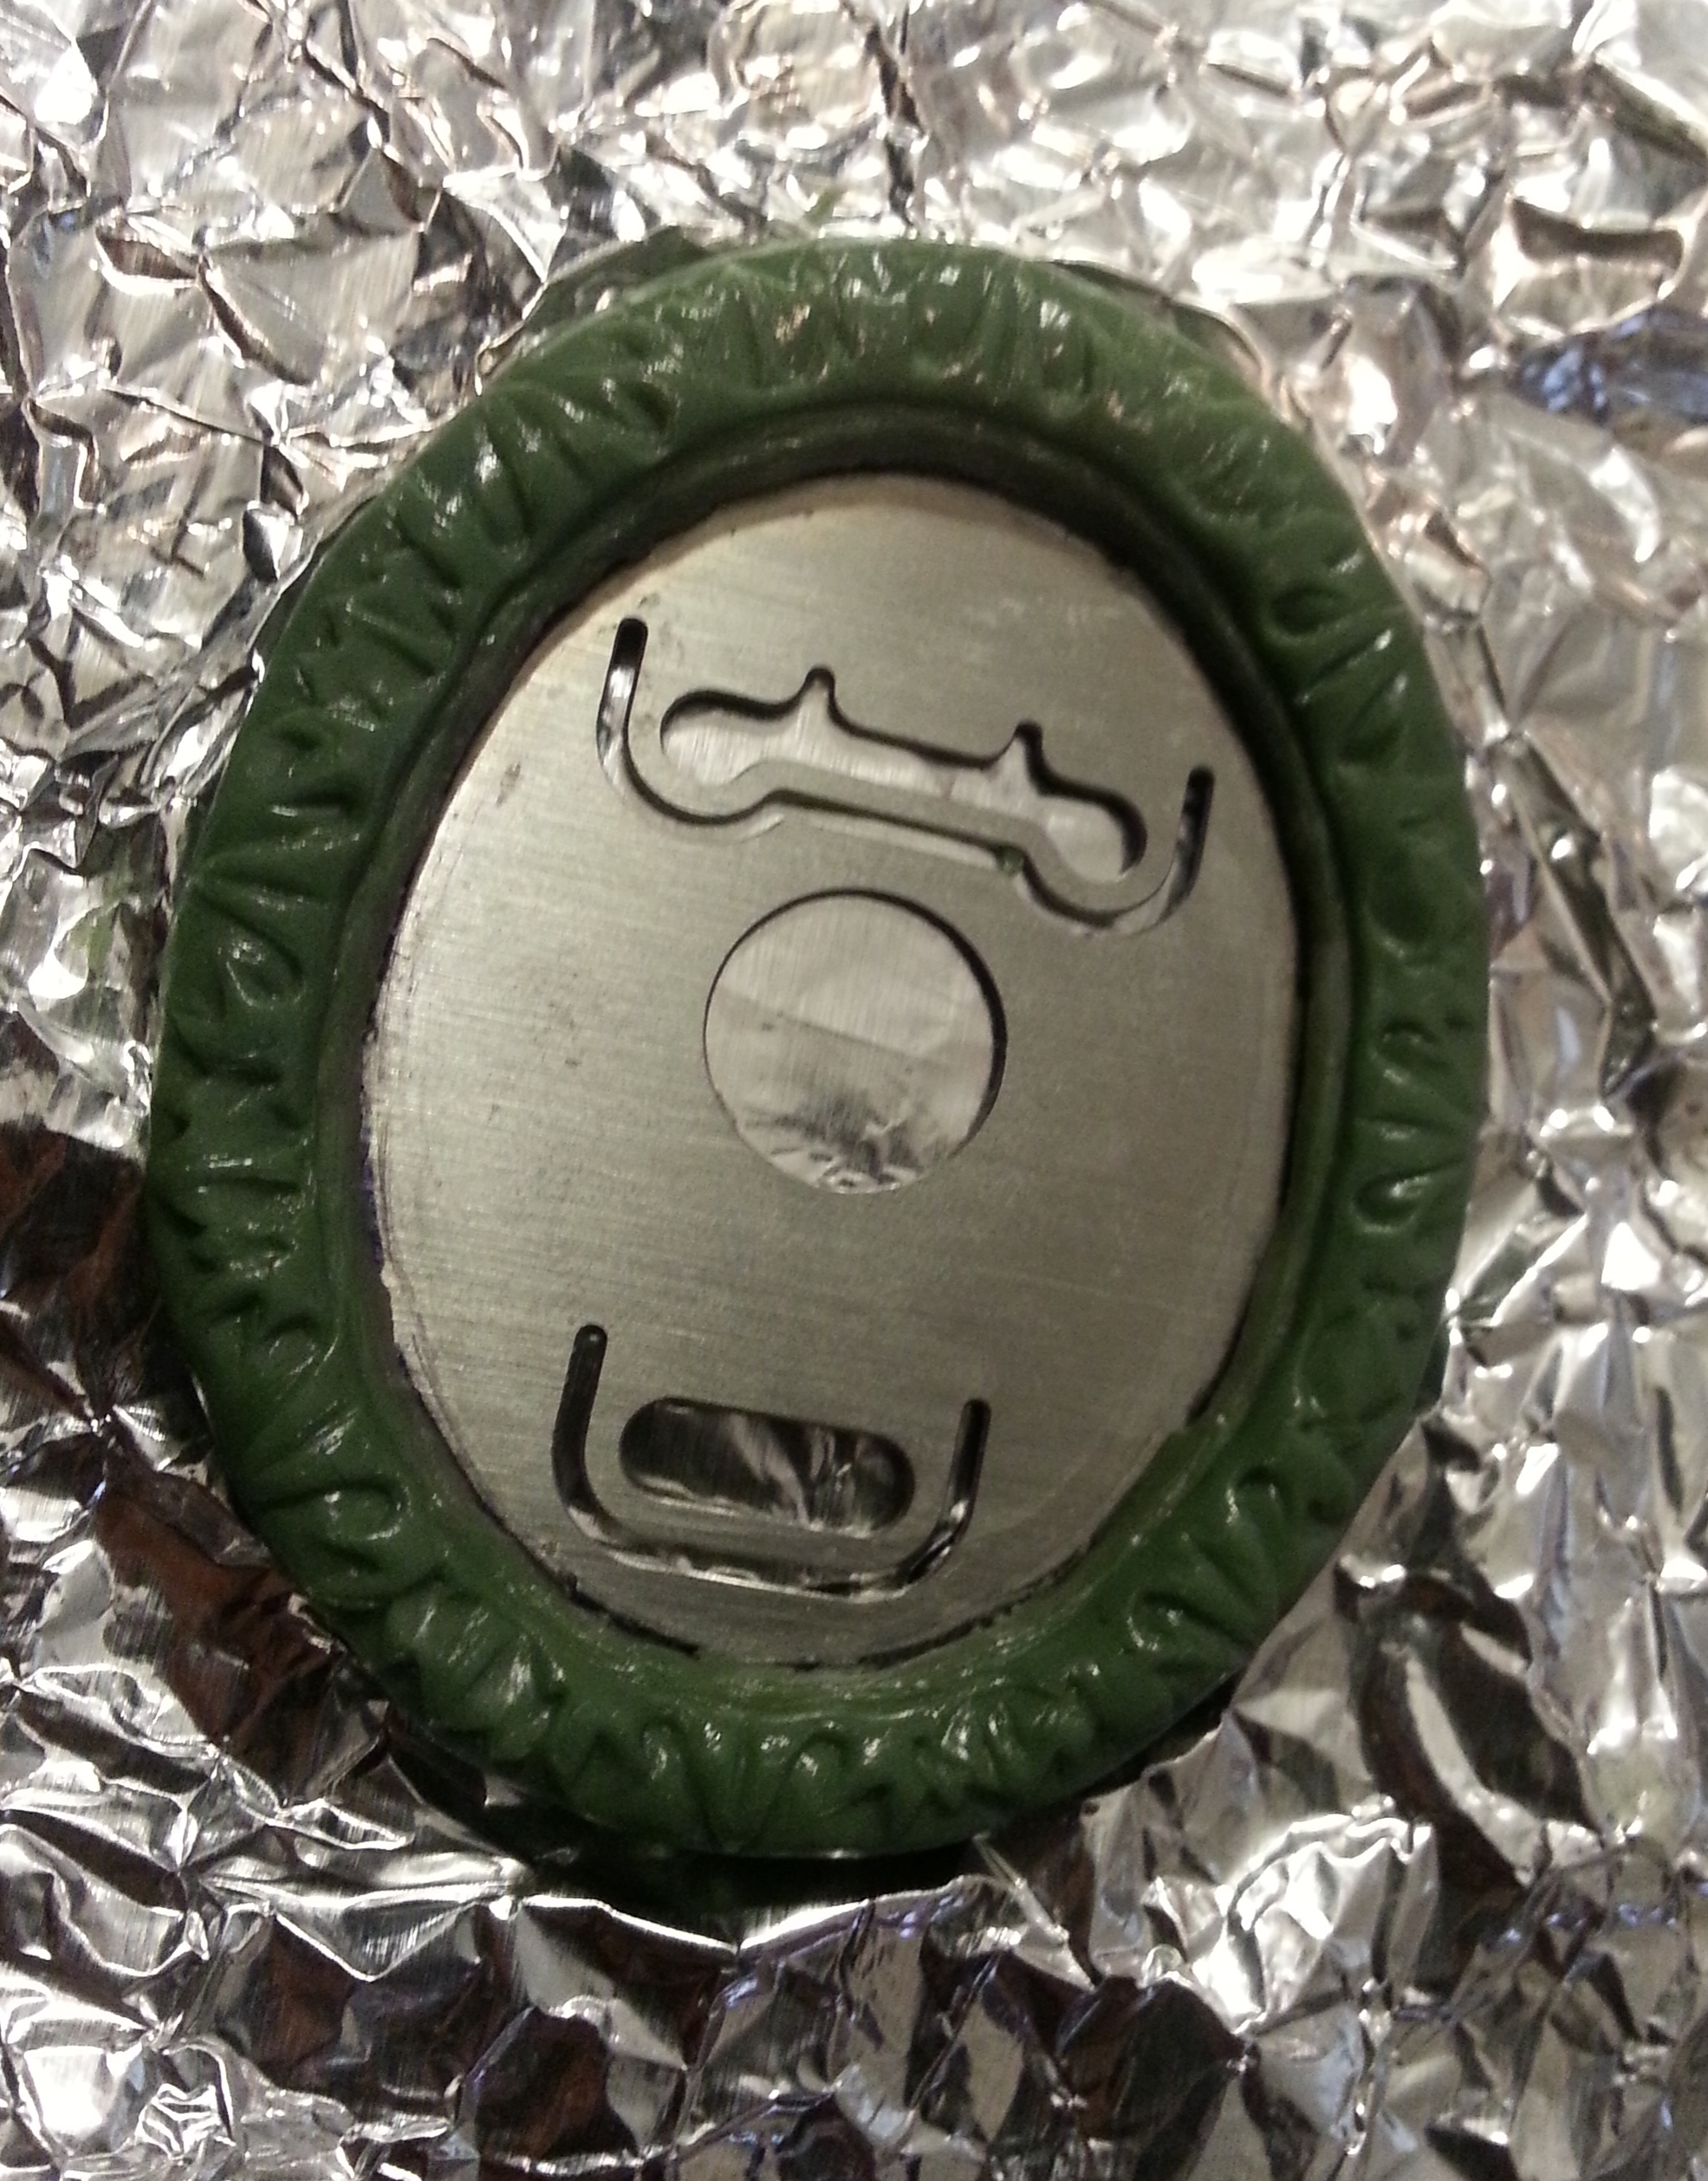
The orangey-red material is uncured silicone rubber for the pewter mold.  I carved cavities in the silicone so that the metal inserts lie flush against the mold and the parting lines are where I want them rather than cutting across the design.  Once the pieces were in place and the rubber was laid down, the whole thing went into a mold form and vulcanized: heated to about 325 F under thousands of pounds of pressure for a couple hours.  During this process the silicone basically liquifies and captures all of the fine detail of the piece, then cures into its solid state.  A release agent put onto the mold before vulcanization allows the mold to be split apart along the lines chosen during molding.

20140206_185638.jpg

Here you can see the color difference caused by the heat of vulcanization: the browner pieces have been heated while the greenest piece is the original color.  Most epoxy putties can be vulcanized several times, so multiple molds can be made from the same sculpture.  The molds themselves can be used multiple times, as opposed to lost wax casting techniques that have a 1:1 wax sculpture to finished casting result. 

After the rubber is cured, gates are cut to allow the molten metal to flow into the cavities.  There is a good bit of trial and error involved, and the gates and air vents are altered until you get a consistently good cast.  Because the metal is cast at about 450-550 degrees F (depending on alloy), it only takes a few minutes to cast and cool, making the process pretty quick.  Of course, I was greatly helped by having Peter Stachowiak of Perth Pewter overseeing and helping me; he's got 30+ years of moldmaking experience and knows all the tricks.  For the record, this is really a very simple mold, but it's my first.  And hey, it worked!

There is a little bit of flash, but it came off quickly with a dremel tool.  Plus, I'd made sure it wasn't cutting across the design, so cleanup was simple.

20140206_183607.jpg

After getting all of the cavities to cast correctly, I put down the steel inserts in their places.  Then I crossed my fingers and cast again.  The pewter flowed into the cavities and through the holes in the rims of the steel pieces, locking in securely.  Because the steel melts and solders at over a thousand degrees higher than the pewter, the two are bonded together not chemically but mechanically.  It's the equivalent of bolting two pieces of material together rather than welding them.

Here's the pieces all cleaned up and with patina darkening the low-lying areas.  The images below show how the magnet-set enamel clips in and out of place.

20140206_184816.jpg
20140206_184824.jpg
20140206_184948.jpg
20140206_185037.jpg

Here's the final effect, though these pieces are awaiting my next shipment of the pronged plates.

And here, in the spirit of exhaustive completeness, is the resin molding for the game piece.  The is the first test of the mold, prior to venting, using a simple 2-part room-curing silicone.  After pouring the silicone around the green and letting it cure, I had to slice it open to remove it.  This is opposed to the vulcanized mold, which had the two halves predetermined prior to vulcanization.  Once I had the original cut out I poured in a casting epoxy, which is the clear version you see here.  I'll cut down and resculpt one of these as necessary, and possibly do a pewter version.  But in the mean time, I'll be making some colored plastic versions.  Fun stuff!

20140206_185423.jpg

If it's stupid but it works, it ain't stupid.

Photographing enamels is tricky, given their reflective surface and potential depth.  In particular, I was interested in taking pictures of pieces in progress so that I could create time-lapse gifs, preferable something fixed like a lightbox but smaller.  I don't have a great camera, or a lot of room for a setup, but I did manage to think of something.  Access to a bandsaw, some scrap wood and MDF, a clip light I wasn't using, glue, screws, wire, spraypaint, and a leftover Chinese takeout container later, I had my setup:

The gray piece was a clear lid, but I sprayed it from underneath with a neutral gray spraypaint.  By using a midtone, it keeps both light and dark pieces from being drastically over/underexposed, as might happen with a white or black background.

The gray piece was a clear lid, but I sprayed it from underneath with a neutral gray spraypaint.  By using a midtone, it keeps both light and dark pieces from being drastically over/underexposed, as might happen with a white or black background.

I line up the markings and put the piece on the outlined oval (I'm working with multiple pieces of the same size/shape) to make for consistent images and easier compiling.

I line up the markings and put the piece on the outlined oval (I'm working with multiple pieces of the same size/shape) to make for consistent images and easier compiling.

The white plastic diffuses the light and make for softer illumination with less glare.

The white plastic diffuses the light and make for softer illumination with less glare.

The wooden frame keeps my phone/camera in the correct position without shaking.

The wooden frame keeps my phone/camera in the correct position without shaking.

This is the shot resulting from the setup, with no editing done.  I also clearly didn't wipe the dust off the piece.

This is the shot resulting from the setup, with no editing done.  I also clearly didn't wipe the dust off the piece.

The camera in this case is my cell phone, which is of far better quality than the actual digital camera I have, hence the rectangular frame on top of the white container.  It slots into the top, and the camera lens lines up with the hole in the container. 

It may look like a kludgy version of the Enterprise, but it works!  Pretty well, actually.  Just remember: if something is stupid, but works, it isn't stupid.

Secret Santa

So.  I'm currently attending graduate school for Metal, and the program has a traditional holiday party with a secret Santa gift exchange.  The rules are that you draw a name, and you have to give that person something handmade.  It can be metalwork, food, clothing, whatever, but you should try to come up with something that suits them and make it.

Everybody goes into the hat: undergraduates, grad students, faculty.  Despite occurring at a busy time of year, I really enjoy it, particularly trying to figure out just the right thing to make for someone I might not know very well.  However, this year, I knew EXACTLY who it was I drew.

Out of around 30 possible names, I pulled Jamie Bennett, my esteemed professor; he just happens to be an internationally recognized master enamelist and jeweler, specializing in feather-light, semi-abstract electoformed work with rich but subdued colors and delicate painting and who has his very own book.  No big deal.

Having been known to do some enameling myself, I thought long and hard about the perfect gift.  I figured my only real choices were to either make a piece of enameled jewelry knowing that he would be able to spot any technical flaws (though he is gracious enough not to criticize a gift), or to give him something like a cake, which we both know is a cop out.  Also, the holiday party is a potluck and I was already bringing a cake.  So, this is what I made.

AmyWilliamsEnamelBrooch.gif


The piece is a brooch, with my eye as the model.  My enamel work is very different from Jamie's, and there is no point in me trying to make his work as a gift for him, but I pulled some of my color cues from what I know of him and his palette.  My choice of the lover's eye format was less a matter of sentiment than cheeky bravado, in that anyone who looks at it has to stare the artist in the eye; never let it be said that I am afraid of being a pain in the ass.  All kidding aside, the format has become a specialty of mine, and I was riffing on the Carnival masks of Venice (inspired by Jamie's travels to and love of Italy).

Anyway, here's a bit more on the actual construction.

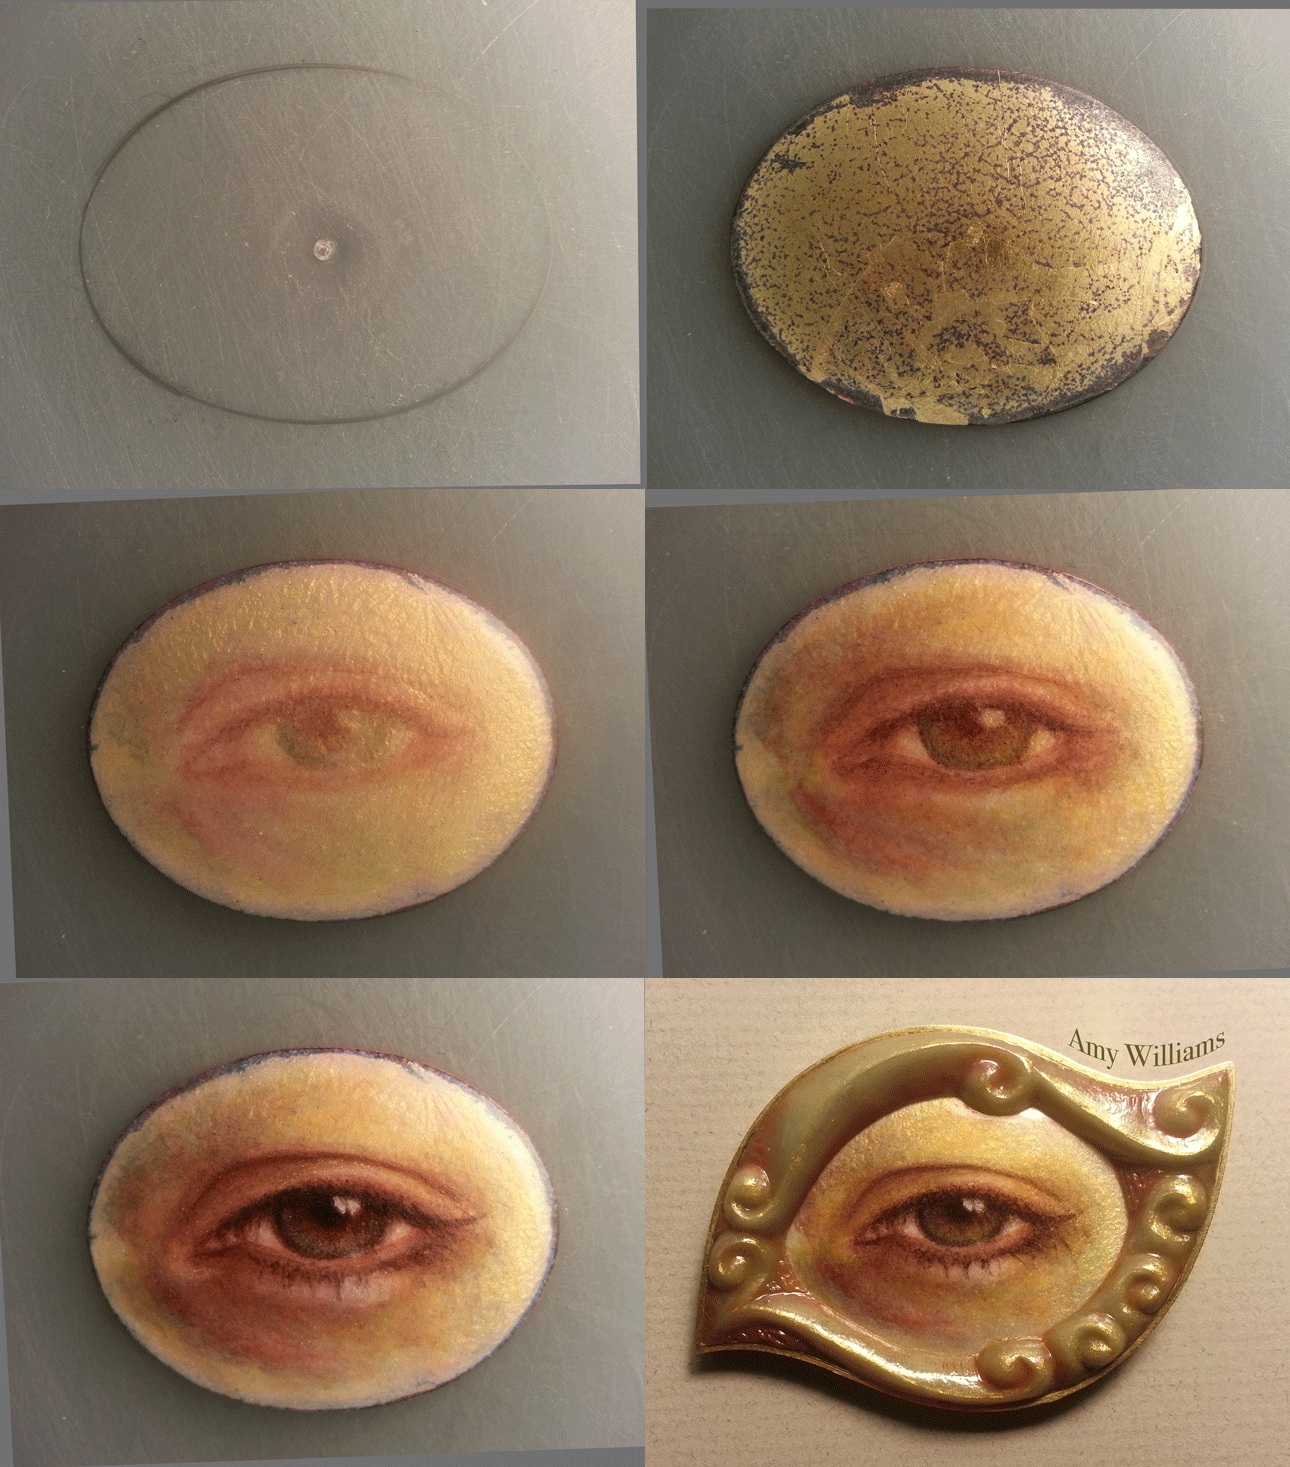
I started with a copper oval with a layer of hard clear enamel (unleaded), put down a layer of gold foil, and topped with a couple thin layers of leaded opalescent white enamel.  I'd actually had the blank ready for a while, but hadn't chosen what to do with it until this project came up.  Fun fact: the opal white over the gold foil is really, really pretty just on its own.

Unfortunately, most of my enamels are best viewed by moving around and seeing the light shift.  But trust me, it's pretty.

Unfortunately, most of my enamels are best viewed by moving around and seeing the light shift.  But trust me, it's pretty.

The real beauty of this enamel is the way the light reflects off the gold foil and is refracted by the semitransparent opal enamel.  Depending on the angle, you may see gold, a bluish cast, or even some pinkish tones.  I think painting on a surface like this is most effective when you use mostly transparent techniques lest the colors end up muddy.  In my experience, the glow of foils under transparent enamels is usually "brighter" than the painting on the surface, meaning that even a pure white overglaze will seem duller than a colored transparent over foil, even if the transparent is a darker color.  I'm not entirely sure of the physics, but you can think of it like taping a piece of white paper onto a computer monitor...the latter will be brighter even if the paper is bright white.  Enamels aren't illuminated from within, but foils will reflect a lot more light back than pigment.

To keep as much light as possible, I used painting enamels I had mixed up using clear flux, meaning they are largely transparent colors when applied thinly. I also did my best to stay away from blacks and browns, opting instead to use complimentary colors to make the shading.  Most of the piece is done with just cobalt blue, red-purple, yellow, and green.  I added a bit of brown, black, and white closer towards the end for the lashes and highlights.  The book Radiant Oils: Glazing Techniques for Paintings That Glow proved surprisingly helpful with regards to color layering suggestions.

Despite how light it is here, this is multiple layers in. 

Here you can see the preliminary color layers I've put down.  The vast bulk of the initial layers were pink and green.

Here is several more layers in, prior to firing.  You can see the yellow I've applied at the bottom of the iris, and the blue shading is much more apparent; prior to firing, the blue is a very light translucent purple, making it easy to under/over estimate the strength of application.  Though the shadows of the lashes are in, I don't put in crisp detail until the last few firings so as to preserve the sharpness.  I also stay away from black until the end, using umber to do the dark details for a little more richness.

I've finally started adding in lashes, still with burnt umber.  The whites of the eye and the highlight have just a touch of the painting white meant to be mixed with the pigment (you can mix them up with either clear flux or the painting white).  It is far more delicate and translucent than overglaze color. 

I don't know why the color balance keeps changing, but I'm leaving the different versions alone so you can see the effects of slightly different lighting.

At this point I've put in all of the blacks and otherwise finished the enamel. 

You can see my little color study in the background.

I like that the crinkles in the gold foil sort of look like skin.

Now!  On to the setting....

I didn't take as many pictures, but so it goes.  I used tracing paper to map out the shape of the setting and the scrollwork I was planning to sculpt, making sure it looked appropriate with the finished enamel.  I then bent a strip of brass using the drawing as a template, soldered it together, sanded it flush, and soldered it to a piece of sheet.  Following the soldering, I cut out the center section to lighten the piece and then cut the sheet flush with the edges of the strip.   

Once the basic shape was ready, I soldered wires to the inside lip so that my sculpted frame would have something to hold onto, and put the catch and hinge onto the back.  I also soldered a bit of tubing under the catch so that I could put a lock on it and prevent the brooch from accidentally coming loose.  After that, into the pickle to clean it up.

After all the soldering, I put the pin wire into place.  To secure the enamel, I put a thin rope of Green Stuff into the setting and squashed the enamel down, creating a slightly bouncy shock absorber between it and the metal.  Once I had it in the proper place, including aligning the signature on the back, I let it set up.  At that point, I put a layer of masking tape over all of the exposed metal so that it didn't get scratched while I finished it.

With all the bits in place and the catch locked.

I really hate sanding, so I wasn't taking any chances.

20131215_001947.jpg

I really like the pale greenish-grey of the "natural" colored Apoxie Sculpt, so I used that to fill the gap around the enamel, being sure to completely embed the wires I soldered inside.  Between that and a little bit of aluminum mesh added in for extra structure, the putty is never coming out.  I then sculpted the Apoxie up and over the enamel a little bit, taking cues from the scrollwork frequently seen on Venetian masks.

After letting it cure, I did a little shading with some old Testor's model paints in green/brown/rust and highlighted it with some gold Liquitex acrylic ink.  The Apoxie takes paint well, but I was afraid it would be susceptible to getting banged up, so I masked off the eye with rubber cement and sprayed it with several generous layers of Polycrylic (after doing extensive tests for compatible sealants; no point in wrecking the piece now).  With that done, I did a little cleanup of overspray with a scalpel, pulled off the tape, and had a finished piece!

And then our early-December holiday party got cancelled due to consecutive snow days and we didn't do the exchange until February.  The end!

Steel and Sculpting

Hooray!  My steel inserts came in the mail!!  Great Lakes Engineering did an even better job than I had hoped.  Behold:

Okay, it may not be exciting for you, but I'm just glad I didn't have to do all of that sawing.

Okay, it may not be exciting for you, but I'm just glad I didn't have to do all of that sawing.

Having done quite a bit of testing with laser cut chipboard and hand-cut prototypes, the finished pieces came out pretty well.  A few changes are needed, but most everything works as planned.

This was the first time I'd hired someone to do an aspect of production for me, and I have to say, it ruled.

This was the first time I'd hired someone to do an aspect of production for me, and I have to say, it ruled.

By bending up the tabs and adding some wire for pin stems, the bolo tie, pin backs, and prong settings all function.  From here, it is just the slight detail of sculpting what will be cast in pewter.  Also, by "slight detail" I mean "potentially enormous undertaking," but the time spent at this stage of production should mean a the settings can be produced at will when it's time to go.

Here's the process I went through sculpting the settings.  As the pieces I'm making here will go through vulcanization, I've opted for an epoxy putty to make the masters for molding.

The pronged piece is for reference.

The pronged piece is for reference.

Leaving the edge bare let me keep an eye on thickness.

Leaving the edge bare let me keep an eye on thickness.

I started by putting down a layer of Apoxie Sculpt and letting it cure to provide a minimum thickness for the pewter areas and so that I didn't encroach on the area the enamel itself needs.  During the sculpting process itself, the epoxy putty can be soft enough to distort and flatten from the pressure of shaping it.  By allowing the Apoxie to cure, it forms a support layer and keeps the shape consistent.

Put down a nice, consistent later for the actual sculpting.

Put down a nice, consistent later for the actual sculpting.

Started by firmly adhering the putty, then marking even sections.

Started by firmly adhering the putty, then marking even sections.

Then comes the layer for the actual sculpting detail.  The Apoxie doesn't take super fine detail, but I didn't care for the springiness of Green Stuff.  A 50/50 mixure of the two products gave me the results I liked best.

20131203_160632.jpg

I'd have more pictures of the sculpting process itself, but it turns out I use both hands to do it and can't take a picture at the same time.  I pretty much just poke it with a pointy steel tool until it is where I want it.  I don't carve or remove much material at this point as it is too soft, but when cured it can be filed and shaped quite well.

The sculpting is shiny both from being uncured and from my use of a water-based moisturizer to keep my steel tools lubricated.  Without a little liquid on them, the putty tends to stick. You can use water with Green Stuff, but it makes a "mud" when used with Apoxie Sculpt.  Oily lubricants have to be cleaned off very thoroughly or additional putty won't stick.  Aves Studio's Safety Solvent is also a great option; I tend to use it alongside the lotion.

The blue, green, and gray bits at the front are the putties prior to mixing up.  That's about the quantity I mix up at any given time, as the working period is about two hours before it starts getting too firm to easily sculpt.

The blue, green, and gray bits at the front are the putties prior to mixing up.  That's about the quantity I mix up at any given time, as the working period is about two hours before it starts getting too firm to easily sculpt.

I watched all of Eddie Murphy's movies on Netflix while working on these.  The smell of epoxy putty will be forever linked with Axel Foley's laugh.

And here we have the cured pieces, all ready for molding.  Hooray!

Combining Digital Output with Tradtional Methods

As we know, enamels need settings to protect them from clumsy artists.  However, settings can take a great deal of time to fabricate, particularly if you tend towards the baroque or complex mechanisms.  So, for a while now I've been thinking about interchangeable parts and casting onto armatures.  Well, it is starting to happen.  For all the time I spent looking into dies for the enamel blanks, it turns out I ended up simply getting the pre-cut shape (30x40mm domed oval copper) from people who specialize in that kind of thing. 

That said, I am still getting my machine on by designing a ton of custom shapes to be cut from the 430 stainless steel.  I shaped the forms using 3-D modeling software and then exported them into a vector program so that they could be laser cut.

Pictured: a ton of custom shapes.

Pictured: a ton of custom shapes.

I was feeling pretty good about getting to understand the modeling program Rhino...then I had to use Adobe Illustrator and I remembered how INFURIATING computer programs can be when you don't know exactly what you are doing.

I did multiple laser-cut chipboard test runs so that I had something to experiment with.

Above: experimentation.

Above: experimentation.

Each of the shapes I've made will be placed into a mold and have pewter cast around the edges, then the assorted tabs and cut-out areas are popped up to make the object function.  I've got a brooch, a pin-on beribboned war medal, a pendant, a game piece, a choker/dual hung necklace, a bolo tie, and the actual pronged piece holding an enamel in place (a magnet under the enamel lets it clip to all of the other pieces, plus hey, a fridge magnet!).  The holes around the edge of each piece allow the pewter to flow in and lock into place once cooled, and the center hole enables the user to pop the enamel out from behind.

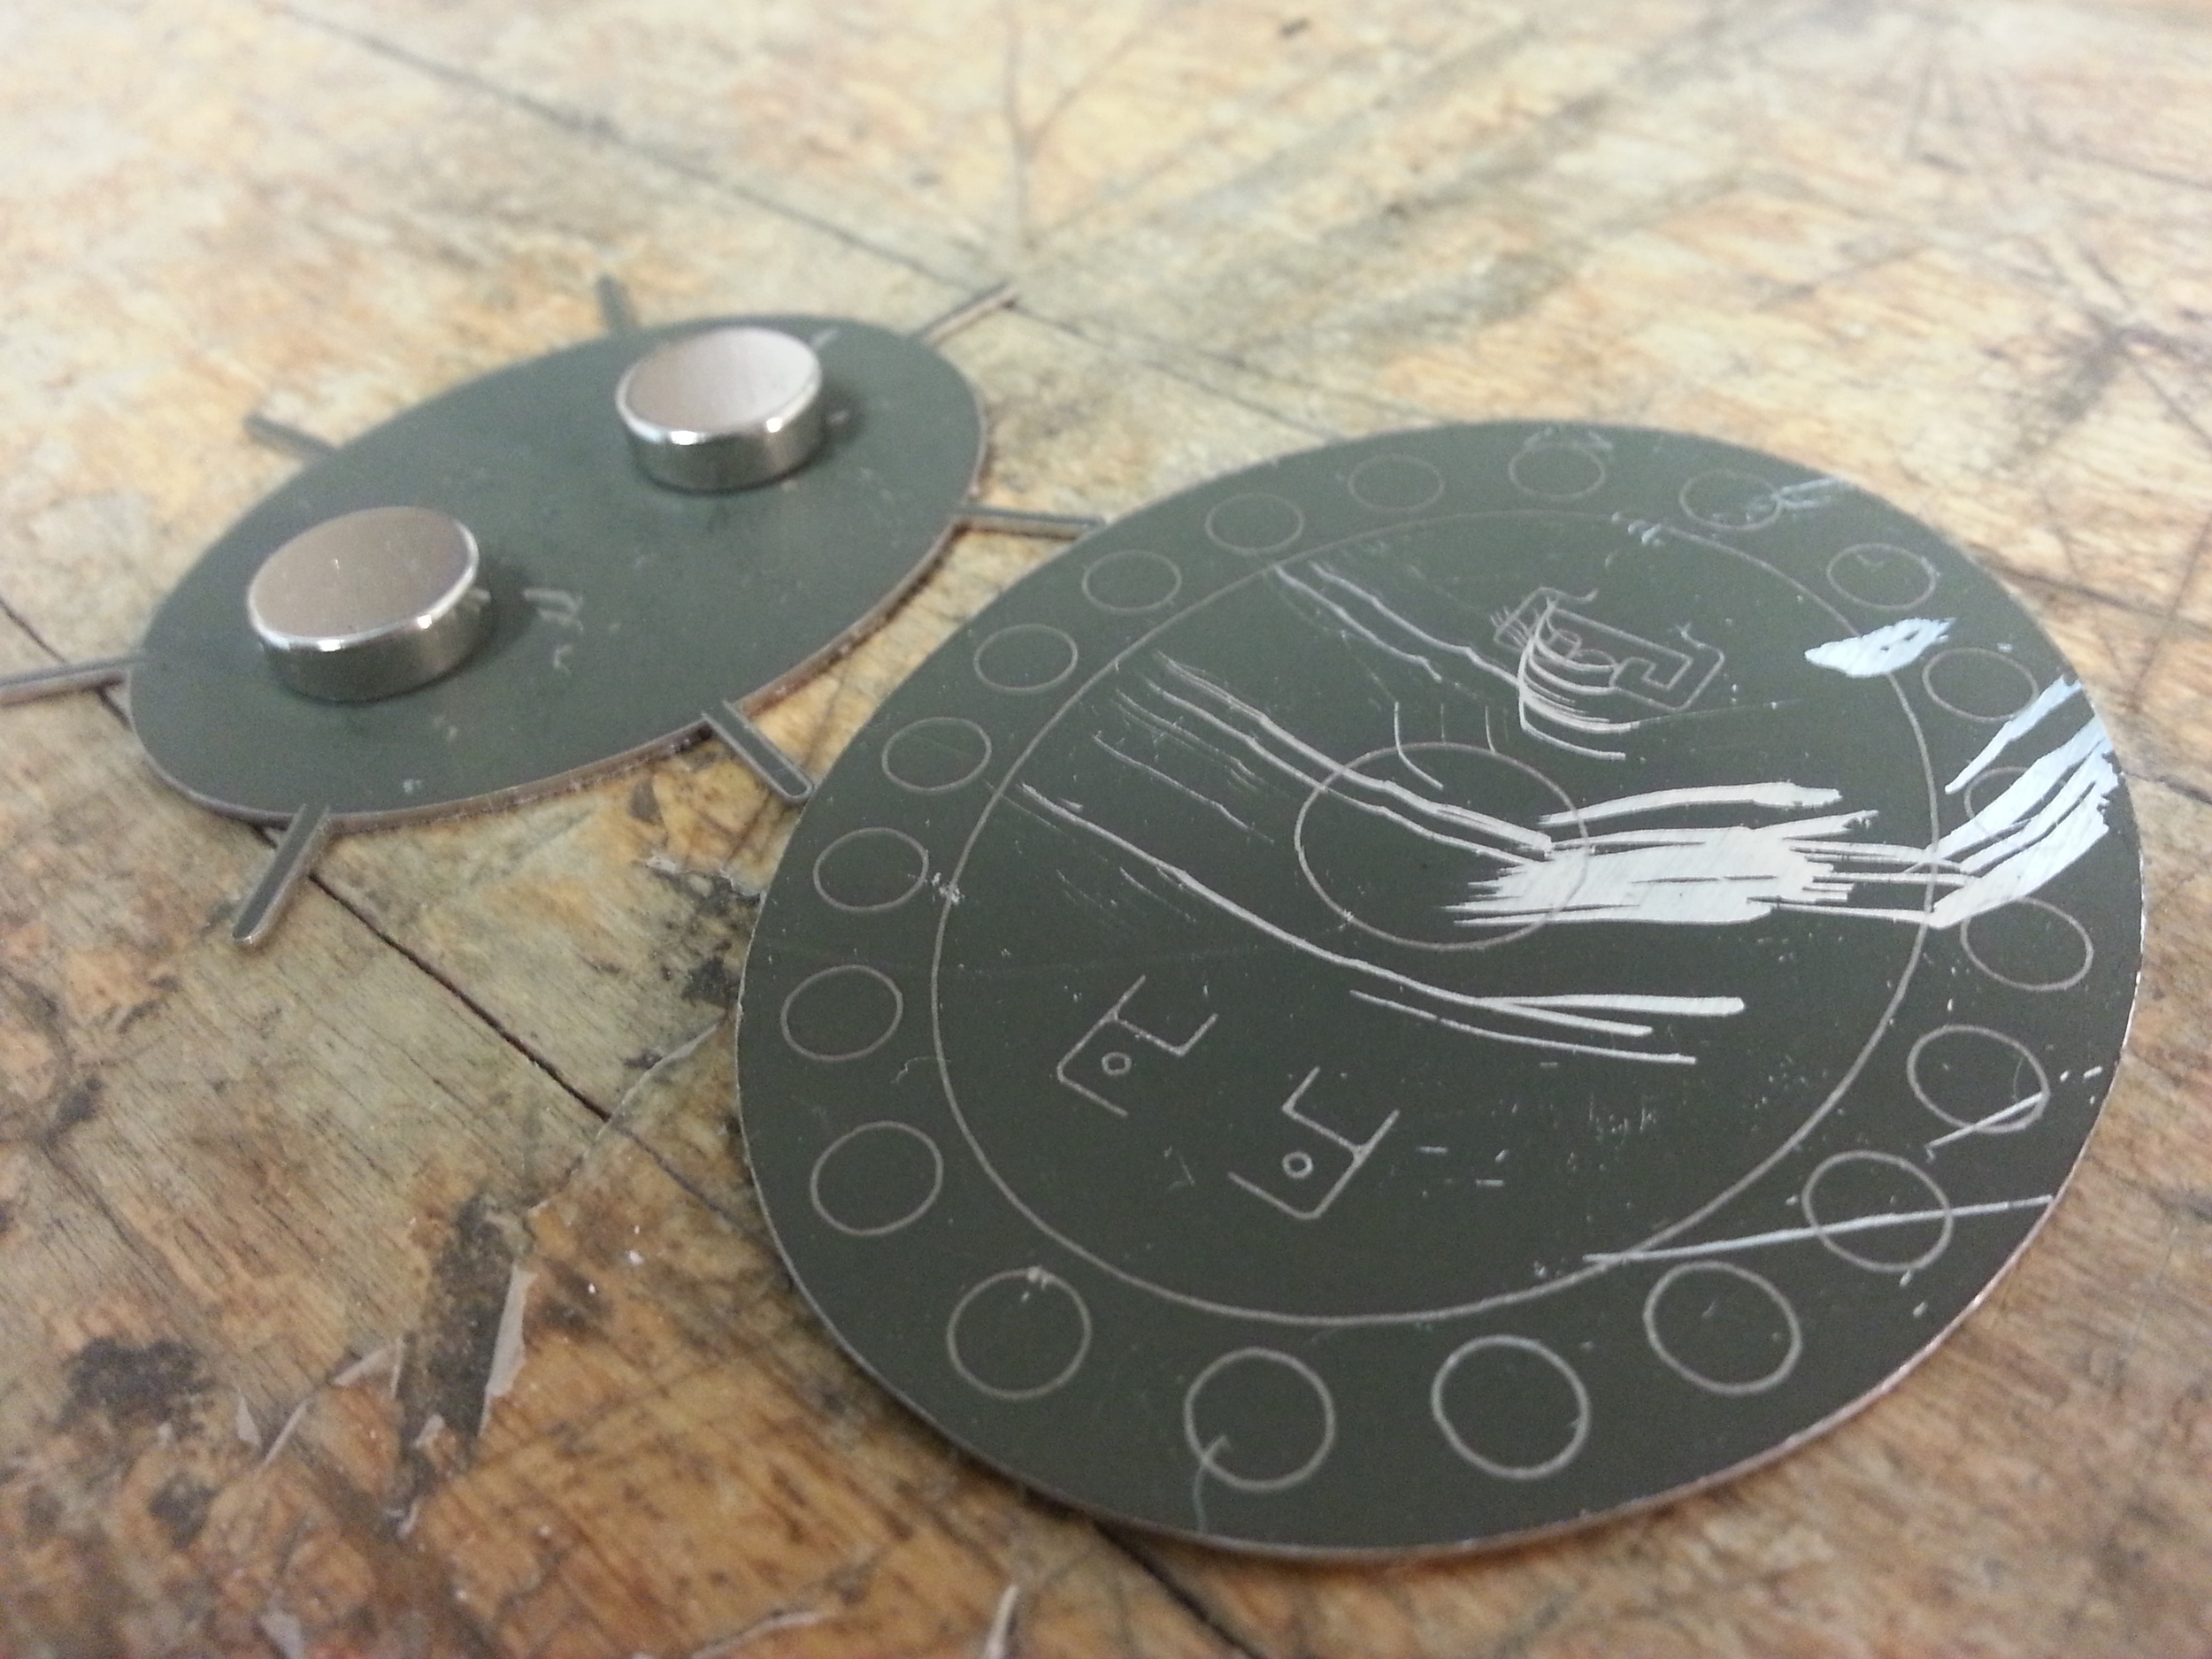
The dark green thing with the magnet is the steel; I spray painted it matte green and used the laser cutter to etch the pattern on and then cut it by hand with a jeweler's saw (the laser cutter I have access to isn't powerful enough to cut metal, but works great for putting on a precise pattern for layout).

Once I get the actual parts made from steel I will sculpt the master pattern for the pewter that will be used to make the mold for casting.  Since I wanted to get a feel for what would happen and the overall effect, I decided to do a test sculpt using the chipboard.

Fresh from the laser cutter.

Fresh from the laser cutter.

I didn't design them all until after I did the test I'm about to describe, but the recursive nature of testing makes for confusing blog posts when presented chronologically.

Two thirds done with the sculpting; I forgot to take an earlier photo.

The green stuff I'm using for sculpting is a two-part epoxy putty that sets up after a few hours.  This is a pretty standard material for people sculpting toys, miniatures, and figurines, and it stands up to the vulcanization needed for the rubber molds used in spin casting.  If you are familiar with Sculpey or Fimo, it is somewhat similar but requires no baking to cure.  The type I'm using is called Apoxie Sculpt but I've also picked up Fixit, Green Stuff, Brown Stuff, and ProCreate.  All of them are a little different and I need to play around a bit more before I figure out  which is best for what.

Scalpels are really way, way better than Xacto knives.

Scalpels are really way, way better than Xacto knives.

After letting the Apoxie cure overnight, I cut out the center of the chipboard and replaced it with a  test cut of the steel so that I could see if the pin stem was placed appropriately and if the magnet I chose was effective.

Popped-up pin back; after the test I opted to go with more rounded parts. And yes, that is scotch tape holding it together. 

The enamel is in the background with the magnet between it and the pronged plate.  A layer of silicone helps cushion it from shock.  After seeing which magnet worked best I've gone back into the files and shortened the length of the prongs.

Plop.

Plop.

Ta-dah!  A functioning prototype!

The cost of getting dies made to cut each of the shapes would be exorbitant, and laser cutting complex shapes gets pricey as well (plus the heat messes with the properties of steel and requires additional heat treatment post-cut to restore it), so I went looking for a different process.  Enter photochemical machining, or PCM.  It's an acid etch process requiring an etch-resistant film over areas you don't want to be removed, but rather than submerging the piece in acid or applying an acid paste the sheet of metal is suspended while acid is sprayed at it from both sides.  Now, I have neither the equipment nor the expertise to do such a thing myself, but happily there are multiple on-demand shops which allow you to send them a file and they send you back the part.  I've already put an order in with Great Lakes Engineering; we'll see what the parts look like when they ship later this month, but thus far their customer service has been excellent.  They do some of the machining for the group Nervous System, so I'm definitely optimistic.  Even if I did have to learn to use Illustrator to make the template they needed.

So. Much. Cursing.

So. Much. Cursing.

Settings

Enamels tend to fare poorly if left entirely unprotected.  I managed to drop a finished piece tonight, and sadly, it is pretty much toast.  In all fairness, I'm more than a touch clumsy and had dropped it multiple times before without breaking, but this time my luck had run out.  


"Settings" are the term for the metal bits that surround jewels and keep them in place, and are really an art unto themselves.  They can also be a tremendous pain to make (well).  But really, there's not a lot you can do with an unset enamel besides put it in your pocket.  As I am trying to see what people do with these portraits, they need to be able to use them and do so in a variety of ways.

The ill-fated gentleman in question.  Knocked a big ol' chunk of enamel out under his jaw..the fracture is visible here.

The ill-fated gentleman in question.  Knocked a big ol' chunk of enamel out under his jaw..the fracture is visible here.

To that end, I've been working on a system of interchangeable settings.  They are compose of steel and pewter, the former for its strength and the latter for its ability to be cast into detailed forms.  Price also factors into this; they don't call them "precious metals" for nothing, and I'd like to make work that is a little more democratic than gold and diamonds without having simplicity forced upon me.

Basic schematics for how the steel will be cast in place with the pewter.  Due to the nature of the molds, the steel has to be precisely the same shape and size to allow for proper casting.

 Because the pieces are meant to be swapped out, precision is key.  Happily, I have been learning how to use the program Rhino in order to design pieces for machining, and will be working with the pewter foundry where I interned over the summer to cast the decorative elements onto the machined steel.  

I am still working out the kinks with prototypes, but hope to finish debugging the settings as soon as I manage to get this website off the ground. 

Steel samples, laser cut chipboard test samples, and the patterns transferred onto steel for testing.

Steel samples, laser cut chipboard test samples, and the patterns transferred onto steel for testing.

Magnets and steel, hand-cut for testing.

Magnets and steel, hand-cut for testing.

To put the question of interchangeable settings into some context, my initial set of portrait pieces (8 in total) took me about two and a half weeks to finish.  I decided I wanted one setting which could hold whichever piece I felt like wearing on a given day. 

I ended up designing and making a silver locket with three separate mechanisms: the hinge at the bottom which allows the cover to swing out; the tension spring which holds the portraits in place (despite slight variations in size); and the locking latch built into the bail (when the bail is upright during use it prevents the cover from opening).

During construction; the open back reduces weight and reveals the inscription on the enamel back. For reference: the ruler is showing centimeters and the grid is 1x1 inch.

Finished locket, open.  The wire springs keep the enamel in place and provide a little shock absorption. I built the piece to be rather rugged in hopes of offsetting my klutziness.

Bail in forward "open" position allows the catch in .

The catch is also friction based, so it clicks closed.

When hung, the bail rotates back and locks the latch in place.

When hung, the bail rotates back and locks the latch in place.

Total time for design and construction? Same time it took to do all of the enamels combined.  Don't get me wrong, I'm very happy with it, but the logistics of building this locket drove home my need for a different sort of solution and pointed me towards the machined steel/magnets/pewter casting route I'm currently pursuing.

So it begins.

Well, here I go.


It is kind of difficult to make an all-black eye look human.

Lighting variations change the effects pretty dramatically.

These are two of the first enamels officially for the AlterPieces project.  Both are different takes on Solomon Wrax, a Chaos Space Marine from the Warhammer 40k universe.  He is a scary, dangerous man.

Both pieces (and all of the enamels planned for the project) start with a slightly domed 40 x 30 mm 18 gauge copper oval. From there, unleaded enamel is sifted on and fired to form the base coat.  To prevent air bubbles getting trapped in the glass and causing later problems, multiple extremely thin layers are built up until it is thick enough to suit the application.

Slowly emerging from the gloom.

Slowly emerging from the gloom.

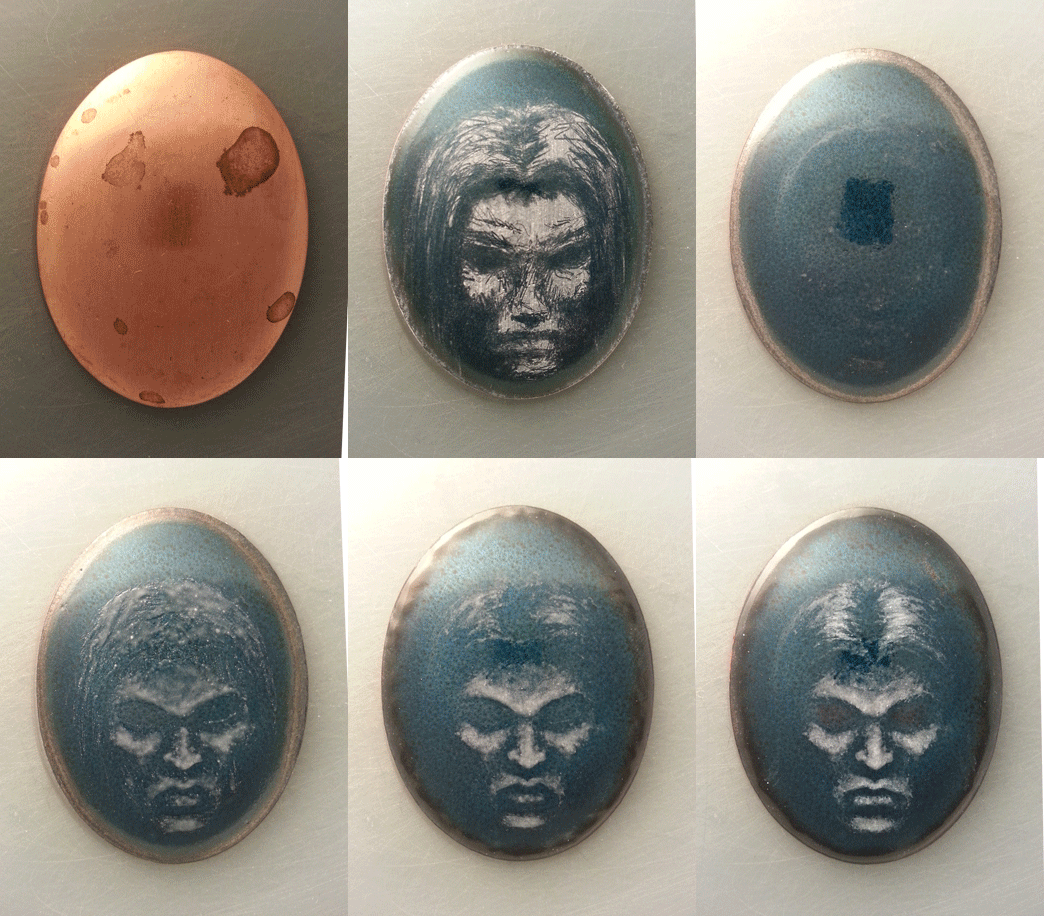
For the full face piece, done with the grisaille technique, an opaque black was laid down first.  I then proceeded to burn the ever-loving hell out of it (on purpose!) until the glass absorbed the copper and went from opaque black to transparent blue.  Once the color was right, I painted on a thin layer of powdered translucent white and scratched it back to reveal the black.  Upon firing, the white disappears almost completely.  By painting on successive layers and firing them, laying down the white in smaller and smaller areas each time, you build up a gradation from the dark background to the white high spots.  Great for dramatic shadows!  

More traditional versions of grisaille, using an opaque black.

Pardon the dancing images, I'm still getting the hang of making gifs.

Pardon the dancing images, I'm still getting the hang of making gifs.

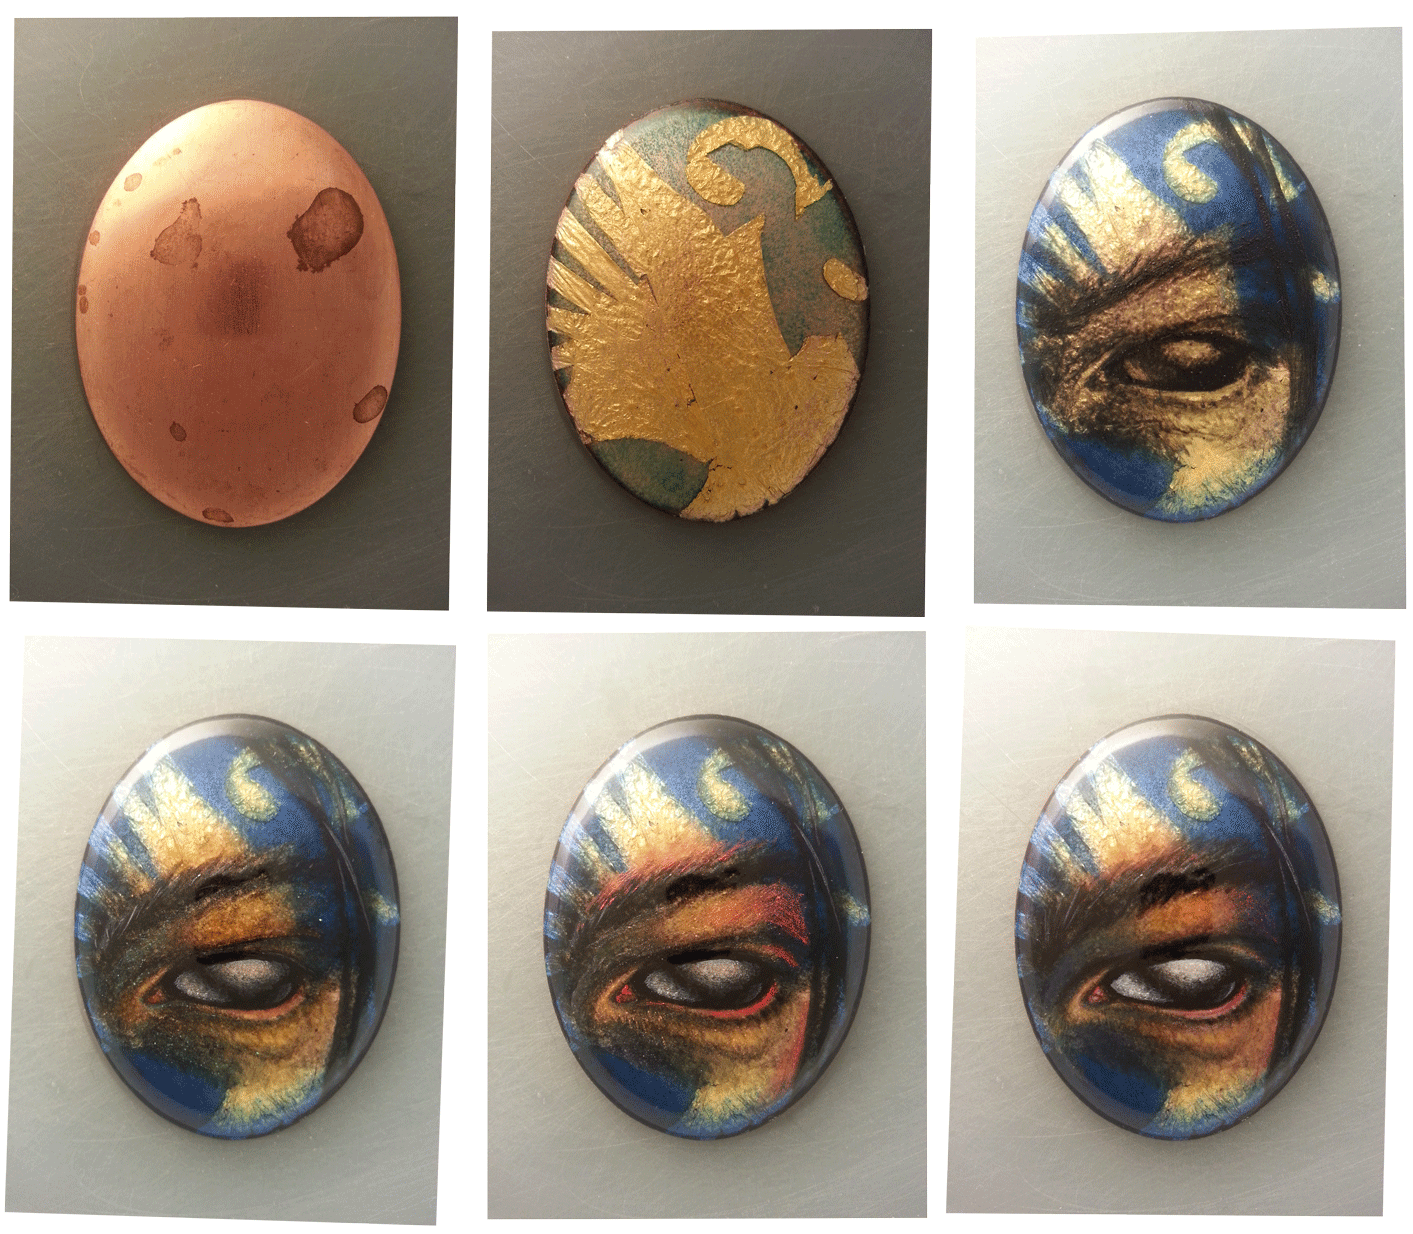
For the piece with the eye alone, I began with a clear base coat and then layered on scraps of 24 karat gold foil.  It is slightly thicker than gold leaf, but nowhere near household tinfoil.  The gold is held down by a few drops of liquid, dried thoroughly, and then fired on until the underlying glass gets soft enough to stick to it.  Upon pulling it out of the kiln it looks discolored, but applying the next layer of clear enamel brings it back to shiny gold. Not liking the color of the base coat, I applied transparent blue enamels.  Following that, a black pigment with no glass in it, treated much the same as the gold foil by heating the piece until the underlying glass sticks to it.

Just couldn't leave it alone.

Just couldn't leave it alone.

I was planning on stopping here, but the layer of transparent enamel over the black pigment didn't quite work for me.  Thus, I opted to go with more color and a more complete rendering of the eye while still letting the gold and blue of the base coat come through.  The colored paints are a mix of overglaze, painting enamel, and watercolor enamel.  The blue and gold isn't really the correct colors for the specific type of Space Marine (Wrax is a Night Lord, not a Thousand Son), but so it goes.


Dies and Interchangeable Parts

So, I'm looking to make some jewelry pieces which use individually painted enamels in mass-produced settings (note: I'm the one doing the mass production).  For that to work, the enamels need to be uniformly shaped (I'm working with a slightly domed oval). I have been using an acrylic die in a hydraulic press to shape to copper I'm enameling, then cutting and grinding them down.  It has worked, just not amazingly.  My die is a little on the wonky side, resulting in slightly eccentric shapes (exacerbated by the fact the edges aren't crisp enough to follow easily when I take them to the sander).  Here's a (kind of crappy) photo of the finished enamels.

For reference, the graph paper squares are 1 inch by 1 inch.  I'm pretty happy with the painting, but the circumference difference between the smallest and largest pieces is about 5mm.  In terms of jewelry sizing, that is really big, and limits the options for setting types.

So, I'm trying to come up with something better. Jewelry supplier Rio Grande's commercially available oval cutter is a.) really expensive and b.) too small.  I've just found Potter USA's dies, which are much cheaper but mostly made for circular press setups (which may or may not be an issue).  I'm going to keep searching, but it may be my best bet is to have something custom made, at least for forming.  I'm still not sure about better cutting options for the formed copper, though this looks interesting.

In any case, if I opt to have a simple steel silhouette die made, there are a number of water jet cutting  services available, so if need be I'll have a plate cut rather than resulting to an expensive custom die manufacturer for industrial use.

The Old and the New

Having been involved with both extremely traditional crafting and digital methods, it has been very interesting to compare the advantages and disadvantages of Rhino and 3D printing with the work I did over the summer: spin cast pewter.  The vulcanized rubber molds and low viscosity of the pewter can make for extremely high-fidelity, high detail castings for a pretty low cost, though they naturally lack the strength of bronze or silver (or even copper).  However, you can actually cast mountings/pinbacks in place, which is neat, though not magnets given their susceptibility to heat.  I worked for Perth Pewter in Chester, NY, which specializes in larger, more complex pieces for the gift market rather than hobby models.  To give you a sense of the attainable detail, here is a piece slightly more than about four inches high. If anything, the image doesn't do it justice.

Though this is not where I worked, and there are some substantial differences in the details of production (like the molds' levels of complexity and finishing procedures), this video gives you a taste of the process:

Given my deep and abiding love for a lot of traditional techniques like enameling, I'm particularly struck by the possibilities of integrating CAD processes to create armatures for physical sculpting and to make uniform, embeddable objects for casting.  To me, it is a way to automate the things that don't concern me as much and instead focus my limited energies on what really shines with hand crafting.  Of course, anyone who has ever struggled to make a computer do something knows that technology is often not a shortcut, but rather a tool with its own strengths and limitations.  The wheel was once cutting edge, too.

Research

So, I've been thinking magnets.  I'm planning on making interchangeable settings with magnetic-backed "jewels."  For a variety of reasons, I need to minimize hand work and processes like soldering, so I'm looking for cold connections and stuff that can be done via outsourcing.  I found a place that sells neodymium magnets, and can even make them to your specs. 

Beyond that, I've been trying to come up with a magnet-compatible material for jewelry.  Magnets are heat-sensitive (particularly anything close to soldering temperatures), so mounting additional magnets onto jewelry becomes a bit of a logistical issue. Steel is quite strongly attracted to magnets but is inclined to rust unless plated or sealed (and that is no guarantee).  Stainless steel? That starts to get interesting.   

If you've ever dealt with a fancy stainless steel fridge, you are probably aware that magnets don't usually stick to stainless.  This does make me a bit sad, as the stainless 3D printing is all currently non-magnetic.  However, there are multiple types of stainless.  We most commonly see austenitic stainless (the 200 and 300 series); due to its atomic structure, magnets won't adhere to it (much).  What I need is ferretic stainless (400 series).  It doesn't hold up as well as austenitic against things like high heat and certain chemicals, but it also doesn't require heat treatment/hardening to set its magnetic properties the way martensitic steel does.  There are other, specialty alloys of stainless; I'm only touching on ones relevant to my concerns.

However, there is another concern: skin/metal contact and the potential for reactions.  Though I know some folks consider the term "stainless steel" to be synonymous with "surgical steel," that is not the case.  Happily, the British Stainless Steel Association has kindly come up with a list of "safe" stainless with sufficiently low nickel for those with sensitivities.  They were even kind enough to denote the type!

So, for a magnet-compatible stainless steel that doesn't require elaborate hardening treatment, has workability, and is safe for the skin,  I need ...drumroll... AISI 430 / 1.4016 ferritic stainless steel!